Wednesday, September 19, 2012

Navisworks 2013 Service Pack 2

Looks like another service pack for the Navisworks family of products was recently released (short list of updates via Beyond Design)…

  • Performance issues when working with a large volume of selection and search sets.
  • Issue where some commands appear disabled after dragging a selection set to a folder.
  • Show command didn't work at the folder level for sets hidden in folders.
  • Crash when trying to drag a set into a folder.
  • Area/Volume properties from Revit Drawings not available.
  • Inventor models are rotated at 90-degrees.
  • A number of unexpected crashes in Clash Detective
  • Unhide All taking much longer when Clash Detective is open.
  • Not possible to rename a Clash result after a drag and drop.
  • Clash groups expand unexpectedly.
  • Renaming results in the Clash results grid performance issues.
  • Resolved a performance issue where loading a model is extremely slow when Timeliner is open.
  • 2D measurement start, end and difference values are incorrect.
  • Cancelling or closing the options editor using keyboard shortcuts retains options.
  • Cinepak Codec for 64 bit is now available.
  • CSV export from Selection Inspector now available

As always, make sure you read the Readme file before installing…the Readme also includes a full list of updates. 

Also make sure you download and install the appropriate version (32bit vs 64bit, as well as Freedom, Simulate or Manage).  Please notice there is also a download for the Navisworks Exporters, so you’ll want to install that as well if you are exporting files to NWC from (for example) AutoCAD or Revit.

Download - Autodesk ® Navisworks ® 2013 Service Pack 2

Monday, September 17, 2012

Timeliner with Primavera Web Service

I recently had an issue come through regarding the use of the Primavera P6 Web Service with Navisworks 2013 and it not working.  The users could access the P6 service outside of Navisworks, but when they attempted to connect to the P6 service through Timeliner, it would error out and not connect/download the content.  The error message was an “Unexpected wrapper element” with some locations called out.

The issue came down to the fact that they were using P6 V8.1…which Navisworks doesn’t support.  I verified with Autodesk support what is supported with Navisworks 2013…

Product: Engineering and Construction: 6.2.1 (SP4 Hot Fix 1), 7.0 (SP4), 8.2
Notes: Requires Primavera v6, 7 or 8 Engineering and Construction to be installed locally or remotely, along with the corresponding version of the Primavera SDK. TimeLiner connects to the Primavera database via an ODBC data source link.

Product: Primavera P6 Web Services: 6.2.1 (SP1 Hot Fix 1), 7.0 (SP1 Hot Fix 1), 8.0
Notes: Requires Primavera P6 v6, 7 or 8 Web Services installed within a suitable Web Application Server such as Oracle Web Logic or JBoss on the same machine as your P6 database.

So if you have plans to upgrade your Primavera services and use it in conjunction with Navisworks, you may want to hold off.

Friday, June 8, 2012

Autodesk Acquires Vela Systems

This should be interesting to see where Autodesk takes this.  Vela already has Navisworks files working on the mobile devices and I’m hoping this means even more integration in the future!

Press release can be read HERE

Tuesday, May 29, 2012

Navisworks Journal Files

A little while back, I was going through removing my 2013 “stand-alone” products so I could install the Building Design Suite Ultimate 2013 and ran across a folder I didn’t remember seeing in 2012…a Rx folder within an Autodesk folder in my Users directory.  Huh, so I opened it up and there lies a Navisworks 2013 folder…with a Journals folder within it.  Now this is interesting…are they somehow introducing Journal Files for Navisworks like Revit has??

Well, no, not really. From what I can tell, a Journal file is generated when you Append/Open a Revit file in Navisworks 2013.  This Journal file appears to be (my opinion anyway) a “record” of what Navisworks is doing in the background when reading the RVT and creating the NWC. 

SNAGHTML1031836

And in case you are curious or want to investigate a Revit Journal file that was created when you Appended a Revit file into Navisworks, this is the location it’s located in (Windows 7)…

C:\Users\*USERNAME*\AppData\Local\Autodesk\Rx\Navisworks 2013\Journals

So if you are having issues when loading/Appending in a Revit file into Navisworks 2013, you may want to check out the Journal file to see if there is anything in the Journal that’s pointing to the problem.

Tuesday, May 22, 2012

Vault and Navisworks 2013

Here are just a couple of the changes that I noticed with Navisworks and Vault 2013…

Yay, we can finally Append from Vault ALL of the file types for Navisworks!

SNAGHTMLac50ff

Navisworks 2013 also now includes a Vault Browser window that will show which files are currently Appended into Navisworks, just like the Selection Tree, but will give some indicators that are shown in Vault.  It will also show which files have been Appended from Vault vs a “regular” Append.

image

The circles that are in front of the file names are the indicators…these will show a few different things.  In the image above, the + sign is indicating that the file is not in Vault.  The empty circle is indicating that this file is in Vault as was Appended via the Vault tools.  There are more, which get’s into more of the Vault functionality…which is a whole other discussion.  Anyway, here’s what the Vault Browser would look like with the files in Vault, Appended from Vault and working on a “checked out” NWF file…

image

Friday, April 20, 2012

Update to Switchback with Revit 2013

I’ve posted a couple times now about the Switchback feature in Navisworks and how it works with Revit.  Well, there is an update to the functionality for the 2013 release in a good way!

When you now use Switchback with Revit 2013, the camera view that you are using in Navisworks 2013 is now created in Revit…literally.  When in Revit, you’ll be directed to a new 3D View called “Navisworks”.  The nice thing is you don’t have to create this view, it happens automatically.  So if you rename or remove the “Navisworks” 3D View and use Switchback again, you’re going to get another “Navisworks” 3D View in Revit.  This is much, much better that what we got in 2012 where the camera didn’t change much in Revit, or maybe just went to a plan view.

Another change is that the object that you’ve selected in Navisworks 2013 to run Switchback with will now actually be selected in Revit 2013 and show the Properties!  Revit 2012 almost had it, but you had to do a few things to make the properties actually show even though the object was “selected”.

One thing though with the object selection potion of this…your results are going to vary depending on what you have your “Selection Resolution” set to.  When I first tried it, I had the “Selection Resolution” set to “Last Object” and the object selection in Revit wasn’t showing.  So I went back and tried the other options for “Selection Resolution” and the one that you want to use is “First Object”.  By using this “Resolution”, the Revit object will be highlighted and the properties of the object will be available.

Here’s a little video showing the new functionality of the Switchback feature for the 2013 products…

Navisworks and Revit 2013 Switchback

One thing to note for those using Revit 2012 and Navisworks 2013…you have the ability to use Navisworks Switchback 2013 in Revit 2012, but the functionality of the Switchback will be the 2012 functionality.

Thursday, April 19, 2012

Navisworks 2013 Selection Tree Changes-Similarities

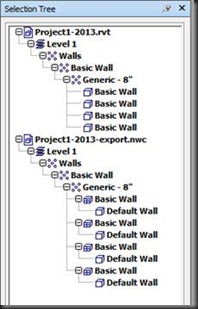
With the ability to now read Revit files, another change with Revit files is how they are organized in the Navisworks Selection Tree.  In the screen shot below, I’ve laid out some examples to illustrate the differences from 2012 Revit based NWC files (2012 and 2013 NWC), Revit 2013 NWC and Revit RVT files…

image

As you can see, Revit 2012 will export to a 2013 NWC file, but the organization stays the same as if it was exported to a 2012 NWC file.  So the new organization (of Level->Family Category->Family Type->Instance) is only going to show up when a RVT file is read directly into Navisworks, or you generate a NWC file from Revit 2013.

One thing to note with the above image, it doesn’t show an Append 2012 RVT file (oops).  I can say that it will show just like a Revit 2013 RVT file as shown below…

image

UPDATE:

Based on a comment I received, I didn’t notice the 2013 RVT and NWC files were named the same.  Since I didn’t refresh the NWF, it probably didn’t matter.  But to be safe, I re-appended the files with different names and the RVT and NWC show the same “structure” of Level, Category, etc. I did however notice that the exported NWC breaks down the Instances a step further than the RVT. Here’s the screen shot…

clip_image002

I didn’t look that closely at the tree before to notice this difference with 2013 Exported NWC’s and RVT’s. The NWC Export Settings and Revit File Reader options are the same, so this is something I want to look into further…

Revit File Reader Options

As I’m sure everyone is aware, Navisworks 2013 can read a Revit file natively.  While this is a nice new feature, I have one “compliant” I would like to file…

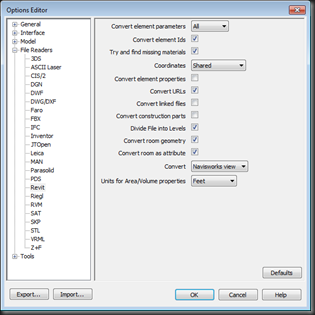
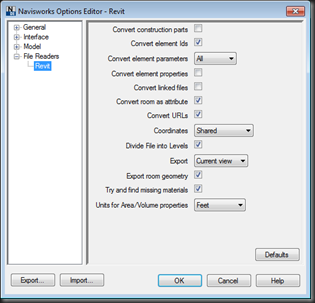
Why are the Options different when looking at the Export Options from Revit vs. the File Reader Options in Navisworks?  They aren’t totally different and quite honestly it doesn’t matter since everything is present, but why aren’t the laid out the same??

Here’s the Navisworks 2013 Revit File Reader Options…

SNAGHTML58cd10

And here’s the Revit NWC Exporter Options…

SNAGHTML5953bc

Again, is this a big deal…no.  But, it’s just something caught my eye and to me doesn’t make sense since Navisworks didn’t have the options in the first place.

Oh, and one other thing…you can’t Import/Export the Options from Revit to Navisworks and vice-versa.  The Import only works within the same Options dialog/platform.

Friday, April 13, 2012

No More Symbol in NWC File Names for 2013

Back in 2012, Navisworks introduced the # symbol in the name of the Navisworks generated NWC files to help differentiate between NWC created via an export. (see this post)

Well, it looks like that has changed in 2013 and has gone back to the pre-2012 way of doing things.  I was Appending in a Revit 2013 file and checked the generated NWC file…no # symbol.  So I did the same thing with a DWG, and again, no # symbol in the NWC name.  It’s very interesting that the addition of the # symbol only lasted a year.

Hopefully I can get some clarification on why this change was made and will report back with what I find.  Thanks Lee from Beyond Design for commenting on why the # symbol was removed and a little clarification on why it was introduced in the first place.

Wednesday, April 4, 2012

Navisworks 2013

Wow, the first part of 2012 has been a busy one!  As you are all probably already aware, the Autodesk 2013 products were introduced on March 27.  Instead of relisting the New Features for 2013, I’ll point you to Paul and Lee over at Beyond Design.  They have a nice list of the new features as well as a couple new posts about some of the features, like Grids and Levels!

As I get some more face time with Navis 2013, I’ll be posting about some of the new features that have been presented and ones that maybe weren’t as “advertised”.

Tuesday, February 7, 2012

e-Specs for Navisworks Coming Soon

Just received this email (below) regarding e-Specs for Navisworks.  Looks like it’s going to be available in the March 2012 timeframe…should be interesting to see this in action.

-------

February 7, 2012InterSpec Inc., the industry leading provider of BIM integrated construction specification software and services, announced today a major new addition to its popular e-SPECS software solutions. e-SPECS for Navisworks enables intelligent and dynamic access to construction project materials data, project specifications and accompanying project related files directly within the Autodesk® Navisworks® application.

“We demonstrated e-SPECS for Navisworks in the fall at Autodesk University to select visitors and the response was overwhelming,” stated Seamus McGrady, Vice President of Sales and Marketing. “Not only were our current customers interested in the Navisworks access to the specs and files, but contractors, developers, owners, and engineers stated they could more fully realize the benefits of the “I” in BIM.”

Architectural and engineering firms doing drawing coordination or merging engineering models can better collaborate with direct access to specified information. Contractors can save time and money during their estimating, bidding and construction phases with electronic access to the coordinated specifications and the storage and quick retrieval of project related files. Being able to review and comment on submittal items online streamlines the procurement of materials and quickens the processing of the required submittals. Owners are able to review and verify their product and system preferences from design phase, through bidding and construction sequences, and into facility management.

e-SPECS for Navisworks enables direct access to project construction information, coordinated specifications and related project files enabling the following benefits:

  • Advanced collaboration of Design and Construction teams in Navisworks' visual project review application
  • Dynamic access to detailed material requirements for Bidding and Estimating through selected Navisworks elements
  • Faster review and return times of required submittal documentation through electronic access
  • Easy document markup for creation of as-built specifications within Revit or Navisworks
  • Instant graphic representation of required building material locations and quantities for coordination and construction planning and owner confirmation.

“BIM users want more validation tools and data access from the recognizable visual models where previously they used printed drawings and spec manuals,” added Seamus McGrady. “Visitors were also pleased that their current spec manuals written in word processors could be integrated and accessed through the e-SPECS for Navisworks application. When you give decision makers access to information at their fingertips, better decisions can be made.”

The e-SPECS Navisworks Plug-In Console is scheduled for official release in March 2012. Current e-SPECS for Revit customers may add on the e-SPECS Navisworks Plug-In Console and take full advantage of the current BIM integration directly within Navisworks. Promotional incentives are available through March 31st, 2012. Contact Sales@e-SPECS.com for more information.

e-SPECS Navisworks Plug-In Console enables intelligent and dynamic access to construction project materials data, project specifications and accompanying project related files directly within the Autodesk® Navisworks® applications.

-------

Wednesday, January 4, 2012

Clash Report and Incorrect Revit ID Numbers

This problem sucks, there just isn’t any good way to put it….

If you’ve been using Navisworks with Revit files, you may or may not have run across this depending on how you use the Clash Reports (exported reports).  When you look at the Clash Report, there is a separate column for the Item ID, which for Revit is the Element ID.  You can use that ID number to search for the Element that is being called out in the Clash. (similar to what I discussed in this post about Revit Interferences)  At first glance, it looks great.  I can grab that ID number, go to Revit and quickly find the item in the Clash, especially if you don’t have the Navisworks model (versus possibly using Switchback if you had the Navisworks model). 

But, there is a problem when it comes to some objects.  Some objects, like Columns, Beams, Diffusers (to name a few) don’t actually report the proper Revit Element ID!!  Yeah, not so good!  From what I can tell, it’s actually calling out the Element Type ID Number and not the Element Instance ID Number.  (See this post about the props of a Revit element and what is considered Instance vs Type)  Some of you may be thinking, well can’t I just use the ID number to find the object in Revit….sorry, no you can’t.  Revit wants the Instance ID number so it can actually find and select the corresponding Instance Element.

Oh, I should mention a way to get the proper number.  Well, there actually is a couple. One being to use DWF’s from Revit instead of NWC’s.  The DWF will put the Element ID number as a suffix to the Name of the object in Navisworks.  But for many, that would require a complete change in process of getting files.  The other way, would be to have the Navisworks model open with the corresponding Clash Test and Results.  When you select a clash, the bottom pane in the Clash window will show you what objects are clashing.  If you select the Element Name, use the Select button, you can then look at the Properties to get the proper Element ID number.

I’ve reported the issue to Autodesk Support, which was escalated to the Development Team.  Hopefully (keep anything and everything you can crossed) that they can solve this issue in the next release of Navisworks!

Tuesday, January 3, 2012

Selection Tree and Revit Objects

This is something that I get asked quite a bit…when I load in a Revit file into Navisworks, why do things like Columns or Doors (as examples) always show the Type Name twice?

If you’re not sure what I’m talking about, here’s a little screen shot…

image

As you can see, the W10x49 has a “sub component” also called W10x49.  What you are really seeing here is the Element and the Type (respectively).  To help explain this a little further, here’s each one selected and the associated “Element” properties…

image  image

As you can see in the image on the left, the Properties for the first item selected displays the Instance Properties of the Revit object.  On the right image, you can see the next item in the list is selected, which is now displaying the Type Properties.

So when you see Revit objects with what seem to be duplicate names, you are actually seeing the Instance and the Type.  One thing to note, this isn’t the same for all Revit objects.  Take Walls for instance, Navisworks only lists out the Instance and the actual geometry (as shown in the top image).

From what I can tell, this helps separate out the Properties and the number of tabs that are displayed.  But, there is an issue with having all of these properties broken out like this, specifically the Element ID!  This ties back to the Switchback post…if you try and use Switchback with the Type selected, it won’t find the object.  And, that’s not all…it also affects your Clash Detection reports!  More to come on that subject soon….