Showing posts with label General Info. Show all posts

Tuesday, September 23, 2014

Turning the Page

Recently, I turned the page and started a new chapter in my work life.  I’ve moved on from being an Application Engineer for an Autodesk reseller in the Chicago area and am happy to announce that I am now the Technical Application Manager for a General Contractor in the Chicago area!

I’ll continue to keep this blog going, just may have a slightly different twist on some of the items I’ll be posting about. I’ll now be dealing with much more that just Autodesk products, so you may start to see some info coming across about how non-Autodesk products are being utilized in conjunction with Navisworks and the BIM 360 products.  You may even start to see posts about non-Autodesk products in general!

It’s definitely a different world being back in the AEC industry…should be a fun ride!

Monday, March 10, 2014

Autodesk 360 vs BIM 360

This topic seems to come up quite a bit and it usually starts off with “isn’t BIM 360 part of my Autodesk 360 account services?”  It’s a pretty easy question to answer…”No”.  Thanks for asking, talk to you later Smile

No, I don’t just leave it at that…

In reality, it’s pretty common for folks to think that BIM 360 is part of their “subscription cloud services” since Autodesk has gone to utilizing the “360” badge for most, if not all, of their cloud based services.  If you take a look at Autodesk’s Autodesk 360 Cloud Services website, it talks about what services are available in the cloud.  It discusses the freebies like storage, access anywhere, etc., then talks about “advanced” features, which includes Clash Detection and Field Management….i.e. Glue and Field (respectively).

However, the BIM 360 services/products are completely separate from the Autodesk 360 cloud services…no tie-in whatsoever.  Yes, BIM 360 Glue/Field are cloud based software/services, but I have yet to see anything, whether it’s my own usage of Glue/Field or any demo/presentation/literature from Autodesk that shows a workflow that allows you to access information you’ve saved to your Autodesk 360 account.

Let me take a step back for a second and explain Autodesk 360 services.  At its core, Autodesk 360 accounts give you storage capability (5GB for non-Autodesk users/non-subscription users and it’s 25GB for Autodesk Subscription accounts/users).  You can also view any document you’ve uploaded to the cloud via a mobile app, share the document with anyone (even if they don’t have an Autodesk account), and even edit a DWG file that’s been saved to your cloud storage with basic editing tools.  Then, we get into the Subscription benefits…which vary depending on what products or suite of products you have.  I’m not going to go into the whole list, but examples are analysis, rendering and simulation to name a few. What’s not included, which is where the confusion sets in, is BIM 360 Glue and BIM 360 Field.

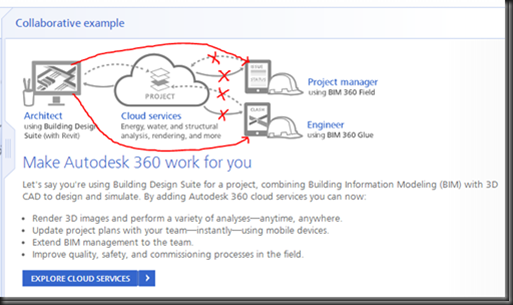
For example, take a look at this screen shot from the Autodesk 360 Cloud Services website…

clip_image002

Notice how the “flow” of information goes…from Revit, to the Cloud Services (Autodesk 360), then to BIM 360 Glue/Field and even back in the opposite direction. Currently this is not a workflow that works!  You can’t access a document of any kind from the Autodesk 360 Services cloud in the BIM 360 applications, or even push information to the Autodesk 360 cloud services from the BIM 360 applications. In my eyes, the image should really look more like this…
clip_image003

Now, the only thing I can say about the above referenced screen-grab is this: there is a possibility that Autodesk can actually make this workflow work via their consulting/programming group, but I haven’t seen or heard of it.

So to sum up, Autodesk 360 and BIM 360 are two different cloud services that Autodesk provides. Autodesk 360 can be a Dropbox-like storage for the non-Autodesk or non-subscription users, or it can be that plus a cloud service area to perform some resource hogging tasks (rendering, analysis, etc.) for those on Autodesk Subscription.  On the other hand, BIM 360 Glue/Field are separate cloud-based applications that utilize their own cloud area to host the associated data per project (or potentially per ‘host” for Glue, which can contain more than 1 project).

Thursday, January 30, 2014

Autodesk BIM 360 Products

So I’ve been pretty quiet on the blog front this year (that’s kind-of an understatement!).  It’s not that I don’t have much to share, but it seems like every day passes way too fast.

The main reason though for my practical non-existence in the blogging world is that in the summer of 2013, I started the trek down the BIM 360 road with Glue and Field.  I was one of only a select few that were chosen by Autodesk to partake in being trained on the BIM 360 products in the US. The BIM 360 products are not like the majority of the Autodesk software and Autodesk didn’t release these products to all of the channel partners/resellers.  So much of my time that I have “free” (time that I’m not spending with customers around a handful of products), I’ve been diving into BIM 360 Glue and Field

I’ve tossed around how I wanted to share my knowledge around BIM 360 Glue and Field.  The biggest question I was asking myself was whether or not I wanted to keep this blog just Navisworks info or if I wanted to turn it into more of a Navis/BIM 360 blog.  Well, I’m going to do the latter.  With both product lines having some similarities/differences and being able to work together, I figured it was best to keep the info all in one place.

So in the near future, you’re going to start to see BIM 360 information along with Navisworks on this blog.  Hopefully I can also start to clear the air a little on the many questions people have around BIM 360 Glue and Field compared to Navisworks…specifically around Glue vs Manage.

Wednesday, January 29, 2014

Navisworks 2014 Hotfix 3

Autodesk just released a new Hotfix for Navisworks (all flavors) and it fixes/resolves the following issues…

- Problems resulting from operations that involve clicking in the first column of the Clash results grid, such as collapsing/expanding groups, dragging clashes and resizing columns.
- Issues with material and transparency inconsistency when importing FBX files.
- Issues with the automatic selection of the correct Rendering engine (Presenter or Autodesk)

Note: it is not necessary to have installed Navisworks 2014 Service Pack 1 before installing this hotfix

You can download the appropriate version HERE

Wednesday, April 3, 2013

System Requirements for Autodesk Navisworks 2014

Below is a grab of the System Requirements for Navisworks 2014…this pertains to Simulate and Manage. 
Please, please note that Windows XP is NOT listed!!  If you are still using XP (or even Vista, which I rarely run into), you’re going to need to upgrade your OS!  Not to say that Navisworks won’t install or run, but any issues relating back to the OS will not be supported.  Also note that Windows 8 32bit is not listed…meaning it’s not supported.  Autodesk has a page dedicated to OS compatibility for Navisworks, all versions - Operating system compatibility for Autodesk Navisworks
System Requirements for Autodesk Navisworks 2014
  • Windows® 8 (64-bit) or Windows® 7 (32 or 64-bit) Home Basic, Home Premium, Professional, Enterprise, or Ultimate edition (recommended) (Service Pack 1)
  • Intel® Pentium® 4 or AMD Athlon™ processor 3.0 GHz (or higher) with SSE2 technology
  • 512 MB RAM (2 GB or greater recommended)
  • 10 GB free disk space for installation
  • Direct3D 9® and OpenGL® capable graphics card with Shader Model 2 (minimum)
  • 1,280 x 800 VGA display with true color (1,920 x 1,080 monitor and 32-bit video display adapter recommended)
  • Microsoft Mouse-compliant pointing device
  • Microsoft® Internet Explorer® 7.0 or later web browser

Wednesday, February 27, 2013

Reveal Hidden Elements for Navisworks

This is more of a “wish-list” item that came up during a discussion with a customer training I was doing. 

The question always comes up…”how do you turn on specific elements that have been hidden?”  Well, the answer(s) isn’t the best…you can look through the Selection Tree and look for elements that have been “grayed” out, Unhide All (then re-hide the objects that are supposed to stay hidden), make the object/objects a Selection Set so you can manage them a little easier, etc.  Basically, there isn’t a good way.

One of the users brought up the idea of having a “Reveal Hidden Elements” mode like Revit has, which is a great idea.  Here’s to hoping that Navisworks 2014 (whenever that comes out) will have such a “feature” to help with object visibility.

Thursday, April 19, 2012

Revit File Reader Options

As I’m sure everyone is aware, Navisworks 2013 can read a Revit file natively.  While this is a nice new feature, I have one “compliant” I would like to file…

Why are the Options different when looking at the Export Options from Revit vs. the File Reader Options in Navisworks?  They aren’t totally different and quite honestly it doesn’t matter since everything is present, but why aren’t the laid out the same??

Here’s the Navisworks 2013 Revit File Reader Options…

SNAGHTML58cd10

And here’s the Revit NWC Exporter Options…

SNAGHTML5953bc

Again, is this a big deal…no.  But, it’s just something caught my eye and to me doesn’t make sense since Navisworks didn’t have the options in the first place.

Oh, and one other thing…you can’t Import/Export the Options from Revit to Navisworks and vice-versa.  The Import only works within the same Options dialog/platform.

Friday, April 13, 2012

No More Symbol in NWC File Names for 2013

Back in 2012, Navisworks introduced the # symbol in the name of the Navisworks generated NWC files to help differentiate between NWC created via an export. (see this post)

Well, it looks like that has changed in 2013 and has gone back to the pre-2012 way of doing things.  I was Appending in a Revit 2013 file and checked the generated NWC file…no # symbol.  So I did the same thing with a DWG, and again, no # symbol in the NWC name.  It’s very interesting that the addition of the # symbol only lasted a year.

Hopefully I can get some clarification on why this change was made and will report back with what I find.  Thanks Lee from Beyond Design for commenting on why the # symbol was removed and a little clarification on why it was introduced in the first place.

Tuesday, January 3, 2012

Selection Tree and Revit Objects

This is something that I get asked quite a bit…when I load in a Revit file into Navisworks, why do things like Columns or Doors (as examples) always show the Type Name twice?

If you’re not sure what I’m talking about, here’s a little screen shot…

image

As you can see, the W10x49 has a “sub component” also called W10x49.  What you are really seeing here is the Element and the Type (respectively).  To help explain this a little further, here’s each one selected and the associated “Element” properties…

image  image

As you can see in the image on the left, the Properties for the first item selected displays the Instance Properties of the Revit object.  On the right image, you can see the next item in the list is selected, which is now displaying the Type Properties.

So when you see Revit objects with what seem to be duplicate names, you are actually seeing the Instance and the Type.  One thing to note, this isn’t the same for all Revit objects.  Take Walls for instance, Navisworks only lists out the Instance and the actual geometry (as shown in the top image).

From what I can tell, this helps separate out the Properties and the number of tabs that are displayed.  But, there is an issue with having all of these properties broken out like this, specifically the Element ID!  This ties back to the Switchback post…if you try and use Switchback with the Type selected, it won’t find the object.  And, that’s not all…it also affects your Clash Detection reports!  More to come on that subject soon….

Friday, December 30, 2011

Navisworks 2012 Switchback with Revit Video

Way back in July, I posted about a new feature for Navisworks and Revit 2012 being able to now use Switchback.  Well, I finally got around to creating the video that I said I was going to. Smile  It’s amazing how time flies when you’re busy!

The video below shows the interaction of Switchback with Navisworks and Revit.  I didn’t put voice to the video, but did input some “pop-ups” with some explanations.

As you can see, there are some interesting things happening in this first iteration of Switchback with Revit.  Hopefully the 2013 versions have a much better integration.

Tuesday, July 19, 2011

Navisworks Switchback to Revit

New in Navisworks 2012 (Simulate and Manage) is the ability to utilize the Switchback feature!  This has been accessible/available to those working with AutoCAD for a while now, but it’s a nice addition to those working with Revit.  I’ve received a few questions about working with Revit Switchback and whether or not you have to export the NWC from the central file or local files?  And if local, how does it know what local file to get and how is it going to get a local that’s on someone else’s computer!?

Ok, well, you don’t have to export from the central and it doesn’t matter what local file you export your NWC from.  The nice thing about Revit Switchback is that is goes strictly by the ID number of the Revit objects…so it doesn’t care what (local) file it’s from.  And as far as what file it will try and open, well, it will look initially for the file the NWC was produced from.  But, not to panic, you will be prompted saying that it can’t find the file and allows you to browse for a new file….your own local file.

The key part about Revit Switchback from the Revit side is that you already have the file open and you’ve initiated Switchback in Revit. 

How do you do this?  Great question, glad you asked! Smile

In Revit, go to the Add-Ins tab and External Tools.  There, you’ll find Navisworks Switchback.

image

Once you’ve selected Navisworks Switchback, you can now utilize Switchback in Navisworks with Revit.  The nice thing, is that you only have to do this once per Revit session.  So if you have Revit open all day, you only have to initiate the Switchback in Revit once.

I have to say though….as much as I like this, there is some work to be done with this feature.  It’s the first iteration, so I expected there to be some little things to work-around, but I guess I also expected this to work similar to AutoCAD and it doesn’t.  I’m creating a little video explaining some of the things that I’ve found that need work, including some of the things I’ve found to get around some of the issues.  Stay Tuned!

Monday, June 6, 2011

Turn Off Sectioning Planes and Keep Section

Ever since Navisworks 2011, we’ve been able to see the actual section plane when working with the Sectioning Tool.  Since we can actually see the plane, many have asked if you can actually turn it off?  And YES, we can definitely turn it off…and it’s simpler than you may think. 

All you need to do is re-click the Move or Rotate or Scale (for the Section Box only) and it will “remove” that tool/option from being active…which will turn off the sectioning plan, but keep the view sectioned!

image

image

Just remember if you’ve saved a Viewpoint of the section….if you turn off the Section Plane (or Box), you’ll need to right-click on the Viewpoint and hit Update so it’s turned off when you come back to that Viewpoint.

Tuesday, April 26, 2011

New Symbol in Navisworks 2012 Generated NWC Files

As some of you may or may not have noticed, Navisworks (2012) generated NWC files (meaning you opened or appended say a DWG file) have a new symbol in the NWC name….the # symbol.  This is something new for 2012 NWC files and is meant to differentiate NWC files created as Cache vs. NWC files exported from other programs.

So when you see the # symbol in the file name, leave it there.  Navisworks doesn’t do anything special with the file or anything, it’s just a way to differentiate the files.  If you delete the # symbol, Navisworks will just recreate the NWC again with the # symbol. 

The reason behind this is in the past, there were cases where users would export their DWG files to an NWC file and place them alongside the DWG files in the same folder with the same file name. They would then open the DWG file in Navisworks, thereby overwriting the exported NWC file with an automatically generated NWC.  So by automatically putting the # symbol in the name, this issue should be avoided.

Thanks to Autodesk support for clarifying the new naming convention!

Thursday, March 31, 2011

Downloadable NWC Export Utility

SNAGHTML1540312

This has been around now for a while, but I know there are people out there that don’t know or didn’t know this was available.

If you go to the Navisworks Product Page, scroll down until you see the link for the NWC File Export Utility (<-or just click the link).  You will be required to fill out the information asked (Name, Company, etc.) and then you’ll be able to download the Exporter.  You can share this with anyone once it’s downloaded…so for those Contractors out there, give this to your subs!!

For those Design people out there, install this so you you can provide the NWC files for those that are using Navisworks to coordinate the design files….even if you are using AutoCAD based products.

Tuesday, March 22, 2011

New Features for Navisworks 2012

Here’s a quick peek at the new Features for the Navisworks 2012 family of products…which is Manage, Simulate and Freedom Viewer.

Navisworks Manage and Simulate

  • User Interface Updates (Navigation Tools on Ribbon)
  • Timeliner Updates (Interface, Tab Integration)
  • Clash Detective Updates (Assign Clashes, Wireframe Mode, Batch Updates) (Only Manage)
  • 2D DWF & DWFx File Support Enhancements
  • Revit Interoperability (Linked Files, Construction Modeling support, Revit Switchback)
  • Vault Integration
  • Appearance Profiler (Assign Colors per Props, Import/Export)
  • Miscellaneous Enhancements (Avatars, FBX Materials)

Navisworks Freedom Viewer

  • Measurement tools
  • 2D DWF & DWFx
  • Gantt Chart Visible

As time goes on, I’ll be posting more about the new features, so stay tuned!

System Requirements for Navisworks 2012 Products

That time of year for new Autodesk products.  Below are the updated system requirements for Navisworks 2012…
  • Microsoft® Windows® 7 Enterprise, Ultimate, Professional, Home Premium, or Home Basic edition, Microsoft® Windows Vista® Enterprise, Ultimate, Business, Home Premium, or Home Basic edition (SP2 or later), or Microsoft® Windows XP Professional Home 32-bit (SP2 or later) or Professional x64 edition (SP3 or later)
  • AMD Athlon™ processor, 3.0 GHz or faster, or Intel® Pentium® 4, 3.0 GHz or faster (recommended)
  • 512 MB RAM (2 GB or greater recommended) (I’d say go with 4 GB minimum)
  • 1 GB free disk space for installation
  • 1,024 x 768 VGA display with true color (1,280 x 1,024 monitor and 32-bit video display adapter recommended)
  • Microsoft® Internet Explorer® 6.0, (SP1 or later)
  • Microsoft Mouse-compliant pointing device

Friday, September 24, 2010

Closing Cloud Redline Tool

Quick Tip:

When using the Cloud Redline Tool, did you ever wonder how to close it off?  Well, it doesn’t work like AutoCAD or Revit…and I’m assuming it’s different for other design software as well.  Usually, you can snap to the beginning point to close off a cloud.

Navisworks doesn’t snap back to the beginning, so when you are ready to close off the cloud, the way to close off the Cloud tool is to actually just right click!  That’s it, just a simple right-click. 

Thursday, May 27, 2010

Saving Back to Earlier NWD or NWF Versions

Navisworks allows you to save you files back to earlier versions, even back to JetStream v5 if you are running 2010.  Yes, sorry…2011 can’t natively save back to JetStream file format.  If you are running 2011, you’ll have to save it back to 2010, then open it in 2010 to save it back to a v5 format.

But, there’s a little something I ran into regarding published NWD files.  Had a customer needing to get their files to v5.  They were publishing their files to NWD, but publishing doesn’t allow you to publish to a different format.  So they re-opened the NWD’s to do a save-as to get to the v5 (or in the pull-down, it’s called Navisworks 5) format but they were only getting the option to save as a NWF file.  I noticed during the publish, the check box for “May be re-saved” was unchecked.  So I had them do the publish again but this time check that box.  When they opened the newly published file, they now got the option to save it as a v5 format.  Here’s the screen shots (from 2010) showing the difference, the publish box on the left and then the subsequent save-as dialog when the published file was opened…

image

image

Now, you can also get around this by just doing a save-as to your current project and choosing the earlier format.  Just have to be careful that you then close the file and re-open the current project file to continue working.  Otherwise, you’ll hit save and “upgrade” the file you just saved back to an earlier version.

Friday, March 26, 2010

Navisworks 2011 Restructure – RIP Review

There’s a pretty decent change in the Navisworks 2011 lineup, and that is the absence of Navisworks Review.  For 2011, Autodesk has decided to discontinue the Review product and now only provide Manage, Simulate and Freedom Viewer.  The functionality that was in Review is still in the Simulate and Manager products, and Freedom Viewer keeps it’s core functionality of being a viewer only.

For those of you who have Review and on subscription, you will now get Simulate for your subscription renewal.  If you have Review but are not on subscription, you can cross-grade over to Simulate.

Friday, March 12, 2010

Moving or Editing Redline Text

I know it’s been quite a while since I last posted anything, but I guess it’s kind-of a good sign that things are going well and I’m busy!

I haven’t seen this one documented much and it’s definitely not in the courseware that we use to teach Navisworks.  If you want to Move or Edit any Redline text you place in a Viewpoint, right-click on the text and you will now have the option to Move or Edit the text.

When you go to Move the text, it doesn’t work like a “traditional” move command you would use in AutoCAD or Revit.  When you hit Move, your curser will change to a little target and then you pick a new point for the text.  Once you pick the point, the text will now move to that location.  There’s no picking base points or anything, just pick a new location for the text. 

And, you don’t have to be in the Redline Text tool to move or edit the text, you can right-click when you are in the selection mode or even a navigation mode!